This chapter contains the following topics:
Introduction to Viewing Purchase Orders
Use this selection to view the information stored in the Purchase Order module from many different viewpoints. You can look at purchase orders, inventory items, vendor items, receivings, vendors, and G/L accounts.
The information available to you if you are not using I/C is stated in each selection.
This selection lets you view posted purchase orders, both open and closed, up till the time they are purged.
Select
Purchase orders from the View menu.
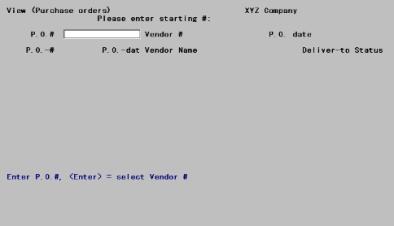
You can view purchase orders in order by purchase order number, by vendor number, or by purchase order date.
Having chosen one of these three methods, you ask the system to display a list of the purchase orders on file, in the order chosen. You can begin at the beginning, or select any starting point. The software displays up to fourteen purchase orders, one per line. You can then select the one you want for detailed viewing. If you do not find it on the list, you can proceed to examine the next fourteen, and so on.
Enter the starting purchase order number for the purchase orders you want to view.
Options
You may also use one of the options:
|
Blank |
To change to viewing purchase orders by vendor |
|
Format |
15 characters |
|
Example |
Press <Enter> |
If you chose to view purchase orders by vendor, enter the starting vendor number for the purchase orders you want to view.
Options
You may also use one of the options:
|
<F2> |
For the Last vendor (with a purchase order) on file |
|
Blank |
To change to viewing purchase orders by date |
|
Format |
999999 |
|
Example |
Press <Enter> |
If you chose to view purchase orders by purchase order date, enter the starting date for the purchase orders you want to view.
Options
You may also use one of the options:
|
<F2> |
For the Last purchase order on file |
|
Blank |
To change back to viewing purchase orders by purchase order number |
|
Format |
MMDDYY |
|
Example |
Press <F2>. |
The following screen shows the purchase orders listed by date:
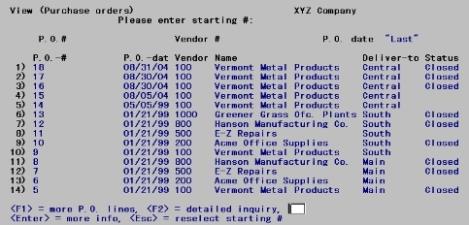
The purchase orders are listed, one line per purchase order.
Options
You may also use one of the options:
|
<F1> |
To view additional purchase orders (if any) |
|
<Esc> |
To start a new selection of purchase orders |
|
<F2> |
For a more detailed inquiry into any particular purchase order shown on the screen |
|
<Enter> |
For more info |
Detailed Inquiry
Each purchase order number shown has a number to its left, called the screen line number. Press <F2> for a detailed inquiry and select the purchase order to view by entering its screen line number.
|
Format |
99 |
|
Example |
Press <F2>, then select a line number. |
The following screen appears:

Show headers or lines ?
You can look at the detailed information for either the header or the lines.
|
Note |
If you look at the detailed header information first, you can then proceed to look at the lines; but not vice versa. |
|
Format |
One letter, either H or L. |
|
Example |
Type: H |
The full header information for the selected purchase order is displayed, as well as the number of open and closed lines on the purchase order and the last change number and change date, if any:
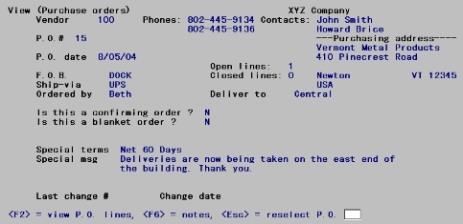
You can now view the detailed line item information for this purchase order.
Options
You may use one of the options:
|
<F2> |
To view the lines |
|
<F6> |
For notes |
|
<Esc> |
To select another purchase order |
|
Format |
Only function key input is allowed. |
|
Example |
Press <F2>. |
The line items are listed on this purchase order, listed five per screen. Each line item has a screen line number immediately to the left:
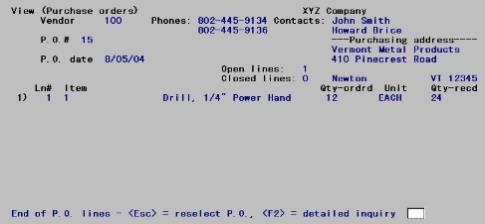
Use one of the options:
|
<F2> |
To see the details of a particular line |
|
<Esc> |
To select another purchase order |
|
<F1> |
To display additional items, if any |
|
Format |
Only function key input is allowed. |
|
Example |
Press <F2>. |
Enter a number for a line for which you want to see more details.
|
Format |
99 |
|
Example |
Type: 1 |
The following screen appears:
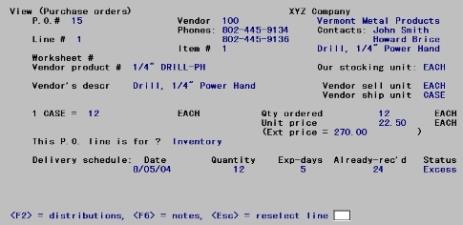
The status of each delivery (open, closed, or in excess) is shown, but no cross-reference is given to the receiver numbers. If you want to trace from a purchase order to its receivers, use the View receivings selection and select by purchase order number.
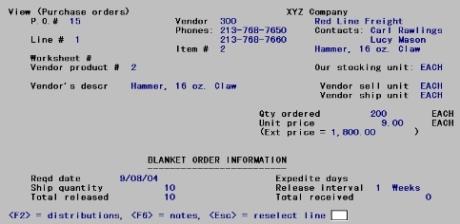
If this line is part of a blanket purchase order, the delivery schedule is somewhat different:
In either case, you have several options for viewing additional information:
|
<F1> |
To view additional vendor product description if any |
|
<F2> |
To view distributions for this line item |
|
<F6> |
To view notes for this line item if any |
|
<Esc> |
To select another line for viewing |
|
Format |
Only function key input is allowed. |
|
Example |
Press <F2>. |
Distributions
The following screen appears:
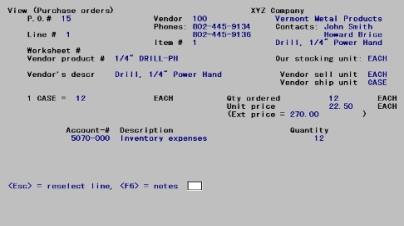
The format of the screen will vary depending on whether this is account distribution or job distribution; also upon whether distribution is by quantity, percent, or amount.
Up to five distributions will be visible on one screen at one time
Options
When done viewing the distribution, you may elect to use one of the following:
|
<F1> |
To view the next distribution (if more than five exist) |
|
<F6> |
To view notes for this line item |
|
<Esc> |
To select another line for viewing |
|
Format |
Only function key input is allowed. |
|
Example |
Press <F6> |
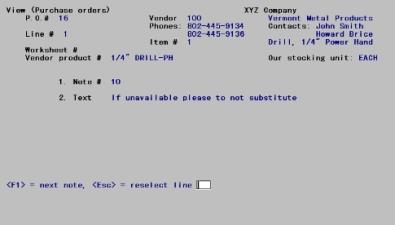
Notes
The first note for this line item displays:
Options
The following options are available:
|
<F1> |
To view the next note if any |
|
<SF1> |
To view the previous note |
|
<Esc> |
To select another line for viewing |
|
Format |
Only function key input is allowed. |
|
Example |
Press <Esc> to return to the line item. |
Press <Esc> to select another line when you are through with this screen.
When you are finished viewing line details, press <Esc> repeatedly until the View menu reappears.
If you are not using Inventory Control with Purchase Order, this selection is not available.
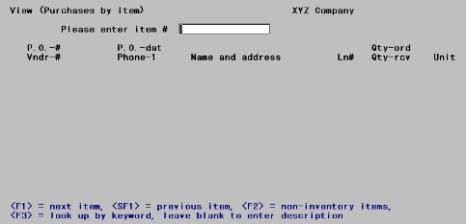
This selection lets you look at posted purchase orders for a specific item.
Select
Purchases by item from the View menu.
Options
Enter the inventory item number, or use one of the options:
|
<F1> |
For the next item on file, in item number sequence |
|
<SF1> |
For the previous item |
|
<F2> |
To look at purchase orders on which you have ordered non-inventory items |
|
<F3> |
For keyword look-up |
|
Blank |
To look up the item by its description |
|
Format |
15 characters |
|
Example |
Press <F1> |
Item lookup by description
If you have pressed <Enter> to select by name, enter the name of the stocking item, or simply the leading characters of the name. The lookup function is case sensitive.
You may also use one of the options:
|
<F1> |
For the next stocking item on file, in item name sequence |
|
<SF1> |
For the previous stocking item |
|
Blank |
To revert to item lookup by number |
|
Format |
30 characters |
|
Example |
Does not appear in this example because you have chosen to look up the item by number |
Non-inventory items
If you have pressed <F2> for non-inventory items, you will get all purchase orders that have one or more such items. The system does not distinguish between one miscellaneous item and another; they are all considered to be a single item with the item number of MISC.
For all methods of item lookup
The description of the item appears, and the purchase orders that have line items containing the selected item number are displayed in order by purchase order number:
Each purchase order line item has a screen line number, and up to five can fit on one screen.
Options
Use one of the options:
|
<F1> |
To see more line items (if any) |
|
<Esc> |
To select another item to view |
|
<F2> |
To look at the detail for any line item shown on the screen |
|
Format |
Only function key input is allowed. |
|
Example |
Press <F2> |
Select a line number for further details, or press <Esc> to clear the screen to enter another item number.
|
Format |
9 |
|
Example |
Type: 1 |
The detailed screen for a line appears:
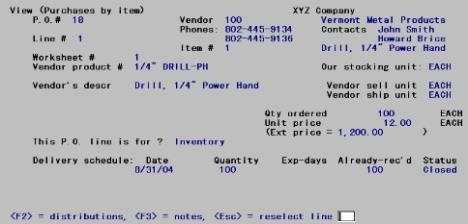
Options
Use one of the options:
|
<F1> |
To view any additional vendor product description |
|
<F2> |
To view distributions for this line |
|
<F3> |
To view any notes for this line |
|
<Esc> |
To select another line for viewing |
|
Format |
Only function key input is allowed. |
|
Example |
Press <F2>. The distribution information displays on your screen. |
The rest of this selection is identical to View purchase orders, so cross-references by page are given above in lieu of repeating the same information.
To exit, press <Esc> repeatedly.
This selection lets you look at the posted receivings which you have on file for your purchase orders. You can examine them by purchase order number or by receiver number.
Select
Receivings from the View menu.
The following screen appears:
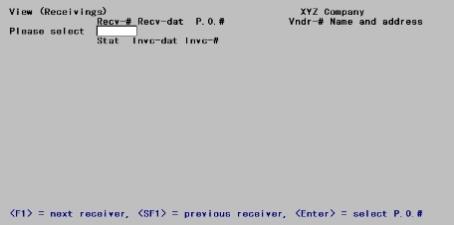
Enter the receiver number or use one of the options:
|
<F1> |
For the next receiver on file |
|
<SF1> |
For the previous receiver |
|
Blank |
To select by purchase order number |
|
Format |
999999 |
|
Example |
Press <F1>. |
When viewing by receiver number
Until you answer Y to the question Right receiver ?, the screen displays the current receiver with the number and date of the corresponding purchase order and the name and address of the vendor. Once you answer Y, the detail line items of the receiver are displayed as described in the Receiver Detail section.
When viewing by purchase order number
Enter the purchase order number.
Options
You may also use one of the options:
|
<F1> |
For the next purchase order on file |
|
<SF1> |
For the previous purchase order |
|
Blank |
To revert to selection by receiver number |
|
Format |
15 characters |
|
Example |
Does not appear in this example because you have chosen to select a receiver |
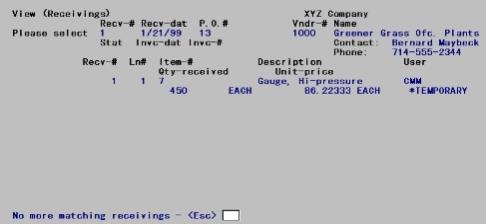
Receiver detail
Up to five line items can fit on one screen. The Ln # column refers to the line number of the purchase order, not that of the receiver; only those line items serviced by this receiver are displayed. When your lookup has been by receiver number, all the line items are for the same purchase order. However, when your lookup has been by purchase order, more than one receiving number may appear on the screen.
Here is a description of some of the other fields that display:
Stat
When the receiving is handled by running Clear uninvoiced receivings this field will display as Clear.
Invc-dat
This field will only display if you are looking up by receiver number (not PO#) and you entered a payable for the receiver in A/P.
This is the date of the invoice after the purchase order and receiver was assigned to a payable in A/P and it was posted.
Invc-#
This field will only display if you are looking up by receiver number (not PO#) and you entered a payable for the receiver in A/P.
This is the number of the invoice after the purchase order and receiver was assigned to a payable in A/P and it was posted.
Options
When done viewing the receiver, use one of the options:
|
<F1> |
To view the next line item (if more than five exist) |
|
<Esc> |
To select another receiver |
|
Format |
Only function key input is allowed. |
|
Example |
Press <Esc> |
Use this function for a quick look at vendors in the A/P Vendor file.
Select
Vendors from the View menu.
The following screen appears:
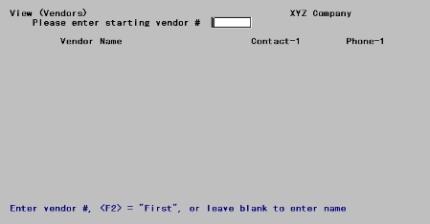
Enter the number of the first vendor you want to view.
Options
You may also use one of the options:
|
<F2> |
To begin viewing at the first vendor on file |
|
Blank |
To switch to looking for the vendor by name |
|
Format |
6 characters |
|
Example |
Press <F2> |
The following screen appears:
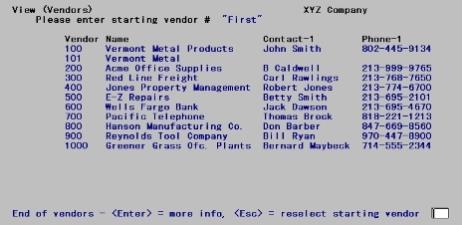
Sixteen vendors at a time can be viewed from this screen, in vendor number sequence.
Options
You can use the following options:
|
<F1> |
To view more vendors |
|
Blank |
To toggle between viewing the first or second contact and phone numbers |
|
<Esc> |
To select another group of vendors |
|
Format |
Only function key input is allowed. |
|
Example |
Press <Esc> |
If you’re not using I/C with P/O, this function is not available.
Use this function to find which vendors sell a selected item. You can use the next function to find which items a selected vendor sells.
This function can also be used to ensure that you have not accidentally specified two prime vendors for the same item.
Select
Vendors for an item from the View menu.
The following screen appears:
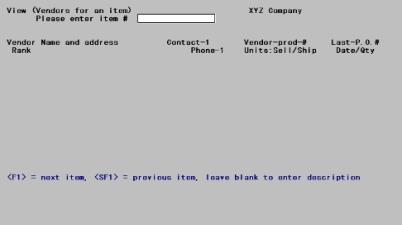
You cannot view miscellaneous items here.
Enter the number of the item you are interested in.
Options
You may also use one of the options:
|
<F1> |
For the next item on file |
|
<SF1> |
For the previous item on file |
|
<Enter> |
To switch to looking for an item by its description |
|
Format |
15 characters |
|
Example |
Type: 5 |
Item lookup by description
If you have pressed <Enter> to select by name, enter the first line of the item’s description, or simply the leading characters of that line. The lookup function is case sensitive.
Options
You may also use one of the options:
|
<F1> |
For the next item on file, in item name sequence |
|
<SF1> |
For the previous item |
|
Blank |
To revert to item lookup by number |
|
Format |
30 characters |
|
Example |
Does not appear in this example because you have chosen to look up the item by number |
The following screen appears:
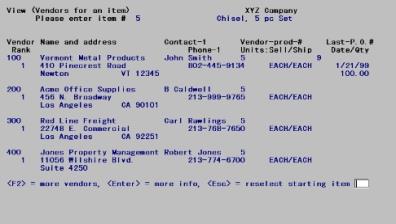
Four vendors at a time can be viewed from this screen, in sequence by vendor number (regardless of rank).
Options
Use on of the options:
|
<F1> |
To view more vendors for this item |
|
Blank |
To toggle between viewing the first or second contact and phone numbers |
|
<Esc> |
To select another item |
|
Format |
Only function key input is allowed. |
|
Example |
Press <Esc>. |
Use this selection to view all items sold by a particular vendor.
Select
Items for a vendor from the View menu.
The following screen appears:
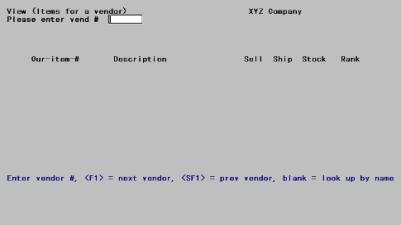
You cannot enter a temporary vendor.
Enter the number of the vendor you want to view.
Options
You may use one of the options:
|
<F1> |
For the next vendor on file |
|
<SF1> |
For the previous vendor |
|
Blank |
To switch to looking for the vendor by name |
|
Format |
Six characters |
|
Example |
Type: 100 |
Vendor lookup by description
If you have entered Blank to select by name, enter the name of the vendor, or simply the name’s leading characters. Upper/lower case is significant.
Options
You may also use one of the options:
|
<F1> |
For the next vendor on file, in vendor name sequence |
|
<SF1> |
For the previous vendor |
|
Blank |
To revert to vendor lookup by number |
|
Format |
25 characters |
|
Example |
Does not appear in this example because you have chosen to look up the vendor by number |
The following screen appears:
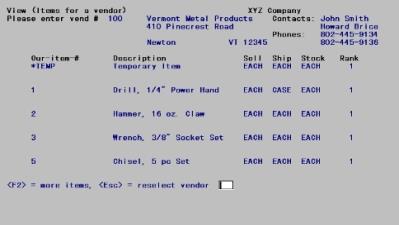
The Sell column refers to the vendor’s selling unit, not to yours.
Four items at a time can be viewed from this screen.
Options
Use on of the following options:
|
<F2> |
To view more items for this vendor |
|
<Esc> |
To select another vendor |
|
Format |
Only function key input is allowed. |
|
Example |
Press <Esc> |